Monday, August 1, 2011

Celebrate Chemistry Give-Away Winners...

Thank you to everyone who participated in the summer "Celebrate Chemistry" sponsored by Dow Chemical.  Along with the investigations, I have been hosting a give-away and today is the day to announce the winners!!

Prize #1 - A Gift Card from Dow Chemical to purchase materials and directions for all the Celebrate Chemistry investigations.  The prize goes to...JKM 135!  Yay!

Prize #2 - A Baking Soda Rocket Kit from The Science Mommy Kits  The prize goes to...Paula!  Yay!


Please contact me ASAP with your mailing information to receive your prizes!

Tuesday, July 26, 2011

Celebrate Chemistry...The Chemistry of Blood

The Science Mommy has been invited by Dow Chemical to Celebrate Chemistry this summer!
Here's what's happening...The Science Mommy hosted a Chemistry Party and will post the investigations over several weeks...this is the last week to enter! 

We did two investigations to learn more about blood...
Blood Typing
Ages: This is for the older Kid scientists
Materials: There is a bit of prep for this investigation and you will need:  Water, vinegar, whole milk, red food color, clear plastic cups and eye droppers or pipettes
 
Procedure:
1 - Set up the investigation
In a lab situation, blood can be typed by adding reagents to blood.  Type A blood will react with Anti-A reagent but not Anti-B, Type B blood will react with Anti-B reagent but not Anti-A.  Likewise Type AB will react with both and Type O will react with neither.  This demonstration mimics the same effect without using real blood or requiring reagents.
* Make a Simulated Blood solution:  add red food coloring (and maybe a single drop of green) to 2 cups of milk until it looks a bit like blood
* Put 1/2 cup Simulated Blood into 4 clear plastic cups.  With a permanent pen, label each cup A, B, AB and O.  The Science Mommy also created two Unknown Samples.
* Prepare Simulated Reagents:  The milk will react with the vinegar but not with the water.  This investigation works better if you have several small dropper bottles on hand, but the Science Mommy only had the cups.  For each blood type, you will need two Simulated Reagents.  For Type A, the Anti-A reagent is vinegar and the Anti-B is water.  For Type B, the Anti-B is vinegar and the Anti-A is water, both are vinegar for Type AB and both are water for Type O.  The prep for this investigation can be confusing but if you label as you go, it works out great.
* Create a data table:
I just drew on an index card with permanent pen and placed it in a snack size baggie...the rows are for the blood types and the columns represent the reagents. 

2 - Complete the Investigation
* Pass around Blood Type A, and each Science Kid puts a drop in both boxes of the data sheet. Then we passed around the Reagents for Type A.  Science Kids put a couple drops of the correct reagent into each drop of blood and look at the results.

* The Science Kids talked about what they were noticing as they confirmed each of the known blood types.  I explained that while this was a simulation, it's a very similar process if you have real blood.
* The final step is to test the Unknown Samples.  Using their data from the known samples, the Science Kids were able to accurately determine the unknown blood types.

Donating Blood
Ages: This is for the Big Kids too.  It's a good investigation to follow the blood typing because it gives Kid Scientists a practical application for knowing blood type.

Materials:  This one also requires a bit if prep.  You'll need: clear plastic cups or dishes, red food coloring, vinegar, water, Pledge Premium Floor Polish

Procedure:
1 - Prepare the Simulated Blood Samples
* Mix 2 1/2 tablespoons floor polish, 3 ounces water and 5 drops of red food color in one cup.  Label Type A.
* Mix 2 1/2 tablespoons vinegar, 3 ounces water and 5 drops red food color in a second cup.  Label Type B.
* Mix 1/2 cup water and 5 drops red food color in a third jar and Label Type O.

2 - Complete the Investigation
* In one cup or dish, Kid Scientists mix 1 tbs Type A and 1 tbs Type O blood.  Observe the results.
*In another cup, Kid Scientists mix 1 tbs Type B and 1 tbs Type O blood.  Observe the results.
* In a third cup, Kid Scientists mix 1 tbs Type A and 1 tbs Type B blood.  Observe the results.

  Behind the Science:  All blood is made of the same basic elements and blood types are different depending on the presence or absence of certain antigens (substances or molecules) that trigger an immune response when they enter the body.  "Self" antigens - those that match or are compatible with your body - are usually tolerated by the immune system.  "Non-self" antigens are identified by the body as intruders and attacked by the immune system.


Watch this video to learn more about the Chemistry of Blood

To Enter:  You must be a follower of The Science Mommy and enter a comment on a Celebrate Chemistry post.  There will be three posts, and you can enter with each post.
Additional entries:  Send the Science Mommy a picture or link to your Science Mommy project and you will receive an additional entry.

Monday, July 18, 2011

Celebrate Chemistry...Finding Baseballs Sweet Spot


The Science Mommy has been invited by Dow Chemical to Celebrate Chemistry this summer!
Here's what's happening...The Science Mommy hosted a Chemistry Party and will post the investigations over the next two weeks.  Each week you'll have a chance to win!


Ages: This investigation is best for the Big Kid Scientists

Materials:Bat, 2 meter sticks, baseball, golf ball, tape

There is a bit of prep for this investigation.  Depending on the age of your Kid Scientists, you could have the prep work done ahead, or the Kids could do it themselves.
Procedure:
  • Mark off 4 cm sections of the bat as shown in the photo.  The Science Mommy only had a kids bat available at home and the investigation worked well.  We tried it later at a friends baseball practice, with a full sized bat and it worked even better.
  • Kid Scientists should hold the bat, straight down, in one hand.  Hold the bat's handle loosely between the thumb and the first finger.
  • With the golf ball, tap the bat in each marked off section.  Ask Kid Scientists what they felt when you tapped the bat.  Was there a section in which the vibrations felt stronger, or a section in which they weren't as strong.
  • Ask other Kid Scientists in the group what they heard when the bat was tapped.  Was there a section that was louder, or where they could hear more vibrations?  Give each Kid Scientist a chance to hold the bat and feel the vibrations.  This is a great opportunity to talk about how we make observations through feeling and hearing.
  •  This step requires a little balance and practice.  Tape the two meter sticks together in an "L" shape to form a ramp.  Place the bat on a box or a stack of books and ask one Kid Scientist to hold it firmly.  Lean the meter stick ramp against the bat and ask another Kid Scientist to hold the ramp.  
  • Roll the golf ball down the ramp to the bat so that it bounces off the bat in Section A. Measure the height of the bounce based on the meter stick. Once the kids know what the procedure looks like and feels like, you can talk about conducting a controlled investigation.  The Kid rolling the ball should start the ball in the same position each time.  The ramp should stay at about the same angle to the bat.  Kids could roll the ball three or four times in each section and average the data collected.
  • Connar collected the data while Emma rolled the ball down the ramp.  Continue this process for each section of the bat.  Where does the ball bounce the highest?  The spot on the bat where the ball bounces the highest is the Sweet Spot!
What's Happening? The sweet spot we found is called "the node", where vibration waves from the impact of the bat and ball cancel each other out.  At the node, more of the bat's energy goes to the ball because it's not used up in vibrations.  When you hit a ball with the node of a bat, you don't feel any vibration in your hand and the ball goes further because it has more energy behind it.

Watch this video to learn more about: Finding the Sweet Spot

To Enter the Give-A-Way: You must be a follower of The Science Mommy and enter a comment on a Celebrate Chemistry post.  There will be three posts, and you can enter with each post.
Additional entries:  Send the Science Mommy a picture or link to your Science Mommy project and you will receive an additional entry.

Monday, July 11, 2011

Celebrate Chemistry...Baking Soda Volcano


The Science Mommy has been invited by Dow Chemical to Celebrate Chemistry this summer!
Here's what's happening...The Science Mommy hosted a Chemistry Party and will post the investigations over the next three weeks.  Each week you'll have a chance to win - click on the picture in the sidebar or read on for more details!

Baking Soda Volcanoes

Baking Soda Rockets 

Ages:  All ages of Kid Scientist will have fun with Baking Soda Volcanoes

Materials:  Styrofoam cups, small paper/plastic cups, film canister, baking soda, vinegar, dishwashing soap, food coloring
This gets messy, so it's a good one for outside!

Procedure:
  1)  Each Kid Scientist will need a large styrofoam cup.  This part of the model represents the volcano.  The Science Mommy cut a hole in the bottom of the cup to accommodate the film canister but Big Kids could do this themselves.  Push the film canister into the hole in the bottom of the cup.  The film canister represents a magma chamber in the volcano.

2)  Put a teaspoon of baking soda into the film canister.

3) Each Kid Scientist also needs a small cup.  We passed the materials for the "Lava Solution" around the circle and kids added them to their cups...1 ounce vinegar, 1 teaspoon dishsoap, red & yellow food color
4) Once everyone had their "Lava Solution" ready, we poured it into the the film canister...

...and watched the foamy, bubbly volcano reaction!

Since we were outside, and had all the materials at hand, the Science Kids at the party decided to explore Baking Soda Rockets...
Ages:  This is best for the Bigger Kid Scientists

Materials:  Fuji film canisters (the clear/white ones), baking soda, vinegar
Procedure:

* I modeled making a rocket for the Kid Scientists.  This is an excellent investigation for Kids because the materials are simple and they can launch the rockets over and over.  It takes some thoughtful experimentation to determine the best ratio of baking soda to vinegar and some practice with rocket launch.
1) Put baking soda into the lid of the film canister and vinegar into the canister itself
2) Attach the lid to the canister and smoothly place it upside down on the launch pad
3) Step back and watch the rocket
4)  Think about what happened in your launch and try it again

Safety Considerations:  * Only one person launching a rocket at a time * Make sure you step away from the launch, especially don't hold your head over the rocket * Once you have vinegar & baking soda all over your hands - don't touch your eyes or face
A satisfying rocket launch is pretty exciting for all Kid Scientists!


You can watch this video to learn more about Baking Soda Volcanos
To Enter the Give-Away: You must be a follower of The Science Mommy and enter a comment on a Celebrate Chemistry post.  There will be three posts, and you can enter with each post.
Additional entries:  Send the Science Mommy a picture or link to your Science Mommy project and you will receive an additional entry.

Tuesday, July 5, 2011

Water Bottle Rockets

I was so proud of my Science Kids...they did this one all on their own, even the photography!
{Please read the safety note at the end}

Ages: This is best for the Big Kids.  Once the rocket is assembled, Little Kids can come and watch the launch.

Materials:  Small water or soda bottle, wine cork, inner tube for a bike tire with the stem, glue, drill, bicycle pump
Procedure:

  • Notice the book in the materials shot?  It's the Dangerous Book for Boys: Things to Do and it's where the Science Boys got the idea and directions for this bottle rocket
  • Assembling the cork and bike stem requires some adult help...the Science Boys asked their dad! 1) Cut the stem from the bike tire inner tube, leaving about a quarter size amount of rubber around the stem  2) Drill a hole through the length of the cork, just the size of the stem  3) Slide the stem through the cork and use hot glue or other adhesive to attach the rubber to the bottom of the cork


  • Head outside with the bottle, water, bicycle pump and cork
  • This is how your bottle rocket should set up prior to launch:  Fill the bottle about 1/3 full of water and push the cork into the top, attach the bicycle pump to the stem and create a launch pad using a rock 
  • Team work is important here as the bottle can be difficult to balance!
  • The rocket is launched by pumping on the tire pump!

  • Several variables can be explored with this rocket...How does the amount of water change the distance of the rocket?  How does the angle of the launch pad change the height or direction of the rocket?  How does the size of bottle change the launch of the rocket?
Safety Notes:
* The Science Boys were supervised while they were working and they asked lots of questions along the way.  They made all the decisions, and you can tell they handled the photography! but they had help with the tools and hot glue
* The rocket does not travel very far or move very fast however this is a great teachable moment about where you should stand for a launch and how to manage the apparatus carefully
* While this sounds like a hassle to set up, once the cork component is ready to go the rocket is quite easy to launch.  Since this requires only water and a bicycle pump, it really kept the boys busy all afternoon!

The Science Mommy would love to hear about your bottle rockets!

Monday, June 27, 2011

Neighborhood Nature Walk...

This is a repost of some fun ways to interest your Kid Scientists in observing the world around them...

Can you see the nest in the tree? Tucked into the fork of a branch right in the middle? I couldn’t see baby birds, but as I stood under the tree, I could hear them chirping. There is a great diversity of living things right in our neighborhoods for Kid Scientists to discover. Here are some ways to encourage Kid Scientist observations…

Digital Nature Walk – Hand your camera to your Kid Scientist during your walk. Challenge her to look for evidence of animals as well as the animals themselves. She might find a train of ants, a nest, tracks in the mud or lady bugs in the garden. Your Kid Scientist can collect her observations with pictures. If she’s really adventurous, she could create a Field Guide for your neighborhood.

Nature Walk Scavenger Hunt – For those Kid Scientists who need help slowing down and observing write a Scavenger hunt list on an index card to take on your walk (if your Kid Scientist can’t read you can read the list to him or enlist an older sibling to be his partner). Include things you know he’ll find easily as well as a couple real challenges…a robin, a wild flower, a spider web, a nest, animals tracks, ducks…

ABC Nature Walk – As you’re walking find things that begin with each letter in the alphabet…ants, bumble bee, columbine, daisy…this is way for your Kid Scientist to learn more specific names for things as well. If following the alphabet is too much of a challenge, you can turn it into ABC / I Spy, “I see something that starts with L” “Lady bug”


Nature Walk 1 2 3 – As you walk, ask your Kid Scientist to count what they’re seeing. “How many birds will you see before we get to the corner?” “How many daisies are on this plant?” “How many dragonflies do you see?”
Amazing Things – Tell your Kid Scientists that at the end of your walk everyone will get to share an Amazing Thing they saw while walking home. Giving your Kid Scientist a chance to walk with wonder, looking at everything, encourages creativity and close observation. Once you’re home, it’s interesting to hear what they thought was amazing.

Sounds of Nature – Have your Kid Scientists sit or lay down with their eyes closed for one minute – just listening. At the end of the minute, ask them to share what they heard. If bird sounds are clear, ask Kid Scientists if they can figure out how many birds are making the sounds.
The Science Mommy would love to hear about your Neighborhood Nature Walk

Wednesday, June 15, 2011

Shaving Cream Marbling...

This project has already been posted, but we had a great time putting together this package of cards.  My Little Kid Scientist Aiden asked if he could share them on The Science Mommy...

Ages:  This is best for older Kids.  It's a pretty messy project and requires a bit of dexterity.  With supervision & assistance though there's no reason to eliminate the Little Kids.

Materials: food color, toothpicks, shaving cream, paper plates, plastic knives or popsicle sticks, napkins, cards or any cardstock (gift tags & bookmarks would work well too)

Procedure: 
Start by filling a paper plate with shaving cream.  Choose the basic, least expensive type of shaving cream you can find.  Use a plastic knife or popsicle stick to smooth the shaving cream into a relatively flat surface.

Add a few drops of food color to the shaving cream.  Here's a great spot to have a chat with your Kid Scientist about mixing colors..."What colors will I have when I mix blue and green?  Let's find out..."
Drag a toothpick through the colors & shaving cream to create any type of marbled pattern. 
Lay your card or other paper onto the marbled pattern.  Make sure you press the card into the shaving cream so that all the color is transferred to the paper.
Here's the messy part...pull the card off the shaving cream.  Using the knife or popsicle stick scrape the excess shaving cream off the card.  You can then use a paper towel or napkin to wipe the remaining shaving cream off the paper.  Clean as much off as possible.  The soap in the shaving cream adheres the food color to the card...you'll scrape of shaving cream, leaving the marbled pattern behind. 

Shaving cream can be reused several times.  In this example Aiden blended the blue & green leftovers he had scraped off a card, then he added yellow drops on top. 
Leave the cards out to completely  dry before packaging.
This is a messy science project!  However, shaving cream is essentially soap so the clean up happens fast!
The end result is a unique collection of handmade cards!

The Science Mommy would love to see pictures of your marbled cards!

Tuesday, June 7, 2011

Road Trip Science...

Driving home from a fun weekend vacation, the Science Kids were getting very squirmy in the backseat.  My solution...a quick hike and exploration of roadside geology!

Ages: All ages of Kid Scientists

Materials: The beauty of roadside geology is that you don't really need any materials.  If you're not sure what geology you're seeing, there is a great series of books called Roadside Geology and they are specific to your state.  The books list major roadways and detail the geologic formations visible from the road.

Procedure:
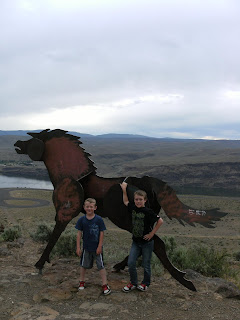
* We stopped at a viewpoint with a huge public art installation called Grandfather Cuts Loose the Ponies
* There is a parking lot at the view point, but the kids were squirmy, so we decided to hike to the top
* It was a great hike, but the roadside geology lesson started on the way back down the hill...

* The Columbia river gorge is full of columnar basalt and the trail we were hiking on was also covered with basalt.  The boys made observations on the difference kinds of rock and we observed the layers evident in the basalt columns on the hillside.  Vesicular basalt looks like it's full of pockets or like swiss-cheese.  This is because as an igneous rock (formed from lava) it cooled more quickly, trapping air in the lava.  The basalt with a smoother texture cooled more slowly, without trapping air.


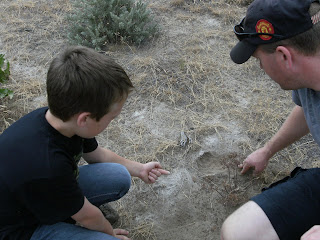
* Connar noticed some gray patches in the soil along the path.  The Gorge was also covered with ash following the eruption of Mt St Helens in 1980.  It's still quite easy to find deposits of ash, which is exactly what Connar noticed.

A quick hike, a little exercise for their brains too, and we were back on the road...with new rock samples for our kitchen collection.

Where can you stop with your kids for a roadside geology exploration?

Tuesday, May 31, 2011

Plant these Flowers...

The Science Mommy has been busy with soccer and teaching, but it's really exciting to be back!

These flowers are fun and easy to make!  

Ages: All Kid Scientists can make these flowers...Little Kids may need help with the scissors

Materials:  Wildflower seeds, paper, scissors, wire, popsicle sticks or skewers, flour, water, ribbon

Procedure:
1.  Cut a large circle out of the paper...our paper started about 3" x 3".  This doesn't have to be a perfect circle but my youngest Kid Scientist had a tough time free hand so I drew a circle for him.

2.  Cut a spiral into the circle.  Each spiral will be one finished flower, so cut as many as you want.

3.  Prepare a paste using flour and water.  The Science Mommy didn't measure but there is about 1/4 cup flour and 2 or 3 tablespoons of water.  We created much more paste than we really needed.

4.  Lay the paper spirals on a cookie sheet or other mess-containing container.

5.  Using a finger cover the spiral with flour paste and then sprinkle the wildflower seed onto the paste.  Make sure the seeds are adhered to the paste. 

6.  Leave the paper flowers sitting out so that the paste has time to dry.  Make sure the paste is completely dry before moving on to the next step.


7.  Roll the paper spirals into paper flowers.  Use  tape to secure the spirals to each other as you roll.  Then push a wire stem (popsicle sticks or skewers would work as well) through the center of the paper flower.  Tie a ribbon under the paper flower if you'd like.  


7.  Arrange into a bouquet!  The paper flowers can be planted in a container or flower garden, the paper will decompose and the seeds will grow.  Make sure to remove the stem, tape and any other embellishment prior to planting.
Have fun with this project...the Science Mommy would love to see pictures of your seed flower bouquets.