Driving home from a fun weekend vacation, the Science Kids were getting very squirmy in the backseat. My solution...a quick hike and exploration of roadside geology!
Ages: All ages of Kid Scientists
Materials: The beauty of roadside geology is that you don't really need any materials. If you're not sure what geology you're seeing, there is a great series of books called Roadside Geology and they are specific to your state. The books list major roadways and detail the geologic formations visible from the road.
Procedure:
* We stopped at a viewpoint with a huge public art installation called Grandfather Cuts Loose the Ponies
* There is a parking lot at the view point, but the kids were squirmy, so we decided to hike to the top * It was a great hike, but the roadside geology lesson started on the way back down the hill...
* The Columbia river gorge is full of columnar basalt and the trail we were hiking on was also covered with basalt. The boys made observations on the difference kinds of rock and we observed the layers evident in the basalt columns on the hillside. Vesicular basalt looks like it's full of pockets or like swiss-cheese. This is because as an igneous rock (formed from lava) it cooled more quickly, trapping air in the lava. The basalt with a smoother texture cooled more slowly, without trapping air.
* Connar noticed some gray patches in the soil along the path. The Gorge was also covered with ash following the eruption of Mt St Helens in 1980. It's still quite easy to find deposits of ash, which is exactly what Connar noticed.
A quick hike, a little exercise for their brains too, and we were back on the road...with new rock samples for our kitchen collection.
Where can you stop with your kids for a roadside geology exploration?
Showing posts with label curiosity. Show all posts
Tuesday, June 7, 2011
Monday, November 8, 2010
The Question Game...
This game is quick and easy to play, but really helps Kid Scientists build their questioning and observation skills!
Ages: All ages of Kid Scientist can play. In fact, once they know how, Big Kid Scientists can set this up for the Little Kids.
Materials: A box with a lid (it can't be transparent), objects from around the house
Procedure:
Ages: All ages of Kid Scientist can play. In fact, once they know how, Big Kid Scientists can set this up for the Little Kids.
Materials: A box with a lid (it can't be transparent), objects from around the house
Procedure:
- Invite your Kid Scientist to play the Question Game
- Place an item inside the box - this is the step where the game can be adapted for the age of Kid Scientist playing or the experience of the Kid Scientist.
- Encourage your Kid Scientist to pick up the box and shake it. Talk to them about all the observations they can make at this point...how heavy the box is, what it sounds like, possibly an odor, what the object moves like...
- Kid Scientists ask questions about the object in the box. They need to frame their questions as Yes or No questions, and you'll answer accordingly. Is it metal? Is it plastic? Is it round? Is it smooth? Can I eat it? Can I play with it?
- As Kid Scientists become more experienced you can focus the types of questions they ask...giving them only 20 questions or requiring that all questions relate to physical properties.
- Questions should also become more specific as Kid Scientists begin to learn about the item in the box
- When your Kid Scientist thinks she knows what is in the box, she frames her conclusion using at least three pieces of evidence. Because I know that it's metal and I use it when I am eating and because it won't hold soup, I think it's a fork.
This is a great "Dinner Game"...pass the box around the dinner table and get the whole family into the questioning. Kids can also play and ask questions when they are in the car.
What adaptations did you discover for the Question Game?
Friday, August 13, 2010
Snorkeling...
The Science Mommy recently had a chance to take her Kid Scientists out into the field, on a snorkeling trip to the Molokini Crater in Maui. Sharing science where we find it is one of the best ways to encourage an appreciation for our world in Kid Scientists. In this case we also talked about why biodiversity is important and had fun identifying fish on the reef.
We started by buying an identification guide for the fish we were likely to see. This one is printed on plastic, so I was able to carry it with me while we were snorkeling.
My Kid Scientists were ready to explore the reef.
We saw a Butterfly Fish...
Some sort of urchin as well as many different species of coral...
Lots of Yellow Tangs...this one was Aiden's favorite.
We think this is a sort of Parrotfish, but it wasn't on our guide.
Lots of Surgeon fish...
...and we were lucky enough to see four endangered sea turtles. Wow...this was the most amazing part of the whole trip!
Wednesday, August 11, 2010
Exploring Tide Pools...
One of the best ways to make science real for all Kid Scientists, is to find it wherever you are. You don't have to be able to identify all the organisms you see, just encourage the curiosity of your Kid Scientist as he explores. Ask him questions about what he is looking at and get in there for a look also.
The boys spent about an hour looking at the tide pools. I made sure to set a couple of guidelines for keeping the animals they saw safe...
- Don't chase animals around the pool
- Nudge shells gently...if something is living inside (it's firmly attached) leave it alone
- If you pick anything up, ask for help to make sure you handle it gently
- Watch where you're walking so that you don't step on any animals or slip and fall
Kyle and Connar saw a huge crab scurrying around on the side of the rocks. We admired it's camouflage, in fact I wasn't even able to get a good photo.
Aiden found several Hermit Crabs and giggled as they ran over his hands. We were very careful to hold them close to the water we found them in and not to drop them.
Since we were in Maui, we spent lots of time looking at the volcanic rock and speculating about how the lava flows would have looked.
What science have you found...on vacation or in your own backyard?
Sunday, July 11, 2010
Investigating Pendulums...
This investigation is a great opportunity for your Kid Scientist to explore variables.
Ages: This investigation is best for Big Kid Scientists
Materials: String or yarn, bob such as a washer or round magnet, stopwatch or other timer, Lab Notes page (this will also help explain the investigation)
Procedure:
Ages: This investigation is best for Big Kid Scientists
Materials: String or yarn, bob such as a washer or round magnet, stopwatch or other timer, Lab Notes page (this will also help explain the investigation)
Procedure:
- Set up a pendulum system
- There are three manipulated variables you can investigate: the length of the pendulum, the weight of the bob and the angle the bob is released
- The period of the pendulum is the time it takes the bob to go over & back one time
- Practice timing the period and releasing the bob
- Explore these questions: Does this weight of the bob have an effect on the period? What is the relationship between the length of the pendulum and the period? Can you create a pendulum system with a 1 second period? How?
What did you learn about pendulums?
Where can you find pendulums in the "real world"?
Tuesday, July 6, 2010
Exploring Pulleys...
Here is another chance to engage the natural curiosity of your Kid Scientist.
Materials: Pulleys, string or yarn, container & weights (the Science Mommy used a paper cup and rocks), a spring scale if you have one
Purpose: This exploration is designed to introduce Kid Scientists to Simple Machines. Simple machines use mechanical energy to make work easier. Big Kid scientists may want to do some research on simple machines to learn more about the energy transfer within simple machines (look in the Kid Science Links). There are three basic types of pulley systems. The Science Mommy will introduce each one, the Kid Scientists can take their explorations as far as their questions will take them.
Procedure:
- A spring scale will help determine if the pulley system reduces the amount of effort required to lift the load. All of these pulley systems can also be explored without a spring scale.
- Create a load. The Science Mommy attached yarn to a paper cup and filled the cup with rocks.

A moveable pulley is located on the load. String is attached above the load, threaded through the pulley and pulled upwards to life the load.
- A block and tackle or combination pulley system uses both a fixed pulley and a moveable pulley. The string can either be anchored above the load or attached to the load. Then it's threaded through the pullies.
Questions to Explore:
How does one pulley work?
Does the size of the pulley matter?
Does the length of the string affect the pulley system?
What is the best way to use a pulley?
What is the most efficient pulley system?
Are there any disadvantages to using a pulley?
Where can you find examples of pulley systems in the "real world"?
Share what you learn with the Science Mommy!
Thursday, June 24, 2010
Science Adventures...
The Science Mommy and her family were recently in Seattle and had a chance to visit the Boeing Museum of Flight. You know how important curiousity is to the Science Mommy and visiting a great museum can certainly inspire scientific curiosity.
One of our first stops was the flight simulator. This is one of the best simulators I have ever ridden, it was absolutely responsive. Connar took the pilots seat and we enjoyed barrel rolls, somersaults and other flight patterns. Flying the simulator required the use of two controls simultaneously and while not a real flight, Connar definitely learned something about the complexity of flying an airplane.
There were several opportunities to get into cockpits and explore the instruments. Aiden was full of questions about how things worked.
The Science Mommy loved the displays. Connar and I spent a long time looking at this one to understand how flight evolved in the animal kingdom.
Musuems are excellent places to explore new ideas, ask questions and feed Kid Science curiousity. Which great museums have you visited?
Tuesday, June 15, 2010
Neighborhood Nature Walk…
This is a repost of some fun ways to interest your Kid Scientists in observing the world around them...
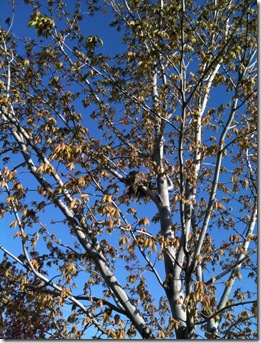
Can you see the nest in the tree? Tucked into the fork of a branch right in the middle? I couldn’t see baby birds, but as I stood under the tree, I could hear them chirping. There is a great diversity of living things right in our neighborhoods for Kid Scientists to discover. Here are some ways to encourage Kid Scientist observations…
Digital Nature Walk – Hand your camera to your Kid Scientist during your walk. Challenge her to look for evidence of animals as well as the animals themselves. She might find a train of ants, a nest, tracks in the mud or lady bugs in the garden. Your Kid Scientist can collect her observations with pictures. If she’s really adventurous, she could create a Field Guide for your neighborhood.
Nature Walk Scavenger Hunt – For those Kid Scientists who need help slowing down and observing write a Scavenger hunt list on an index card to take on your walk (if your Kid Scientist can’t read you can read the list to him or enlist an older sibling to be his partner). Include things you know he’ll find easily as well as a couple real challenges…a robin, a wild flower, a spider web, a nest, animals tracks, ducks…
ABC Nature Walk – As you’re walking find things that begin with each letter in the alphabet…ants, bumble bee, columbine, daisy…this is way for your Kid Scientist to learn more specific names for things as well. If following the alphabet is too much of a challenge, you can turn it into ABC / I Spy, “I see something that starts with L” “Lady bug”
Nature Walk 1 2 3 – As you walk, ask your Kid Scientist to count what they’re seeing. “How many birds will you see before we get to the corner?” “How many daisies are on this plant?” “How many dragonflies do you see?”
Amazing Things – Tell your Kid Scientists that at the end of your walk everyone will get to share an Amazing Thing they saw while walking home. Giving your Kid Scientist a chance to walk with wonder, looking at everything, encourages creativity and close observation. Once you’re home, it’s interesting to hear what they thought was amazing.
Sounds of Nature – Have your Kid Scientists sit or lay down with their eyes closed for one minute – just listening. At the end of the minute, ask them to share what they heard. If bird sounds are clear, ask Kid Scientists if they can figure out how many birds are making the sounds.
Can you see the nest in the tree? Tucked into the fork of a branch right in the middle? I couldn’t see baby birds, but as I stood under the tree, I could hear them chirping. There is a great diversity of living things right in our neighborhoods for Kid Scientists to discover. Here are some ways to encourage Kid Scientist observations…
Digital Nature Walk – Hand your camera to your Kid Scientist during your walk. Challenge her to look for evidence of animals as well as the animals themselves. She might find a train of ants, a nest, tracks in the mud or lady bugs in the garden. Your Kid Scientist can collect her observations with pictures. If she’s really adventurous, she could create a Field Guide for your neighborhood.
Nature Walk Scavenger Hunt – For those Kid Scientists who need help slowing down and observing write a Scavenger hunt list on an index card to take on your walk (if your Kid Scientist can’t read you can read the list to him or enlist an older sibling to be his partner). Include things you know he’ll find easily as well as a couple real challenges…a robin, a wild flower, a spider web, a nest, animals tracks, ducks…
ABC Nature Walk – As you’re walking find things that begin with each letter in the alphabet…ants, bumble bee, columbine, daisy…this is way for your Kid Scientist to learn more specific names for things as well. If following the alphabet is too much of a challenge, you can turn it into ABC / I Spy, “I see something that starts with L” “Lady bug”
Nature Walk 1 2 3 – As you walk, ask your Kid Scientist to count what they’re seeing. “How many birds will you see before we get to the corner?” “How many daisies are on this plant?” “How many dragonflies do you see?”
Amazing Things – Tell your Kid Scientists that at the end of your walk everyone will get to share an Amazing Thing they saw while walking home. Giving your Kid Scientist a chance to walk with wonder, looking at everything, encourages creativity and close observation. Once you’re home, it’s interesting to hear what they thought was amazing.
Sounds of Nature – Have your Kid Scientists sit or lay down with their eyes closed for one minute – just listening. At the end of the minute, ask them to share what they heard. If bird sounds are clear, ask Kid Scientists if they can figure out how many birds are making the sounds.
The Science Mommy would love to hear about your Neighborhood Nature Walk
Sunday, May 16, 2010
A Natural Curiosity...
Kid Scientists are naturally curious. My Kid Scientists pull this magnifier out every chance they get.
This magnifying lens is large enough for Kid Scientists to use and the stand makes it easy to locate the subject (without trying to manage a hand lens in one hand and the subject in the other).
We use the magnifier frequently...when we're growing crystals, or looking at fossils or just exploring things on the counter. I searched around and found this magnifier so you're Kid Scientists can feed their curiosity too.
Subscribe to:
Posts (Atom)


